
If you do not want to run VBS files, there are two ways to disable the execution of these programs.
The hvci windows 11 is a command-line tool that allows users to disable VBS on a Windows 11 PC. There are two ways in which you can use this tool.
Windows 11 has been out for a while, and it seems to be doing well so far. Apart from the fact that it has a dreadful list of system requirements. Windows 11 introduces a new user interface as well as improved performance.
Windows 11 was billed as being beneficial for gamers at its June launch, as it will assist offer improved gaming performance as well as the introduction of Direct Storage. However, there have been complaints that enabling Virtualization Based Security may create performance problems in games. Continue reading to learn how to deactivate VBS on Windows 11.
VBS isn’t a new feature in Windows 11; it’s been around for a while. It’s been around since the release of Windows 10. As a result, claiming that it would cause certain game performance problems is a stretch. However, there are known problems with Windows 11 performance on certain AMD CPUs, which are being investigated. Not everyone believes that enabling VBS would result in performance problems in your games. Anyway, let’s have a look at VBS and how to turn it on or off.
Windows 11 security is based on virtualization.
So, what exactly is VBS? It’s a security feature that protects a portion, or rather an area, of the memory using hardware virtualization to provide a secure mode that inhibits different types of malware assaults from attempting to access sensitive data. User fingerprints, facial recognition data, and other credentials may be included in this data. Yes, having VBS enabled is beneficial and adds an additional layer of protection to your system.
So, why are so many people claiming that it’s affecting game performance? So, it seems that this security measure will use a significant amount of resources. However, because the functionality has been there since Windows 10, no one has raised it as a concern. As a result, having VBS enabled on a Windows 11 PC should be acceptable and shouldn’t affect gaming performance. If you suspect that VBS is causing performance issues on your Windows 11 PC, you may deactivate it right away by following these instructions.
How to Disable VBS on a Windows 11 Computer
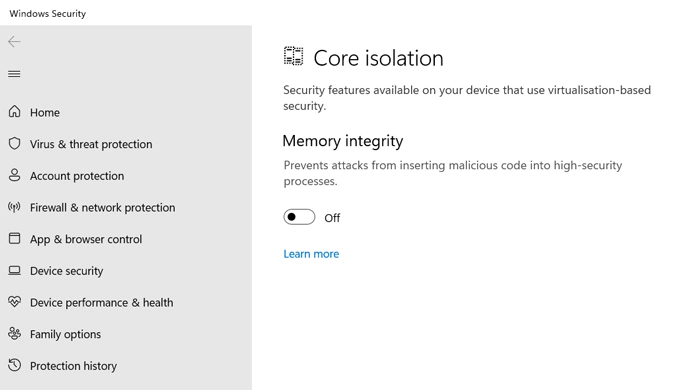
- Type Core Isolation into the Start Menu on your Windows 11 PC.
- From the search results, open the app.
- Memory Integrity will have a toggle next to it.
- To turn it off, click the toggle.
- It will now prompt you to reboot your computer.
- After you’ve rebooted, check to see whether the feature has been turned off.
- If that’s the case, start a game and see if you notice any changes. If there is no change, turn VBS back on, or else keep it turned off.
- It’s worth noting that if you’re running Windows 11 on an unsupported CPU, the choice may be grayed out and you’ll be prompted to scan again since certain drivers are incompatible.
VBS may be disabled by editing the registry.
The Registry Editor tool in Windows is very helpful since it allows you to modify a variety of settings, including the ability to deactivate the Windows Update service and other functions. You can even deactivate virtualization on your Windows 11 PC using this program. To do so, follow these instructions.
- Using the Windows and R keys, bring up the Run Dialog.
- Hit the Enter key after typing regedit.
- It will ask whether you want to open it as an administrator, and you should say yes.
- Simply copy and paste this path into the address bar while the registry editor is active.
- ComputerHKEY LOCAL MACHINESYSTEM CurrentControlSetControlDeviceGuard
- There are a lot of values on the left panel.
- Open EnableVirtualizationBasedSecurity by selecting it.
- Change the value from 1 to 0 and then press the OK button. Simply invert the setting to enable.
- Restart your computer after closing the Registry Editor.
- On your Windows 11 PC, you’ve now deactivated virtualization and VBS.
And that’s how you can deactivate VBS on both Windows 11 and Windows 10. Only disable it if you’re having problems with your games; otherwise, it’s better to have VBS on all the time. Also, if you’re running Windows 11 on a machine that doesn’t match the Windows 11 system requirements, you’ll be OK since VBS will be deactivated by default.
Guides for Windows 11:
The windows 11 vbs is a problem that many Windows users have been experiencing. There are two ways to disable VBS on a Windows PC.
{“@context”:”https://schema.org”,”@type”:”FAQPage”,”mainEntity”:[{“@type”:”Question”,”name”:”How to disable VBS in Windows 11?”,”acceptedAnswer”:{“@type”:”Answer”,”text”:”
To disable VBS, go to Control Panel > Programs > Turn Windows Features on or off.”}},{“@type”:”Question”,”name”:”How to disable VBS in BIOS?”,”acceptedAnswer”:{“@type”:”Answer”,”text”:”
Press F2, then press Delete.”}},{“@type”:”Question”,”name”:”What is VBS Windows 11?”,”acceptedAnswer”:{“@type”:”Answer”,”text”:”
VBS stands for Visual Basic Script. It is a programming language that allows you to create software, games, and other applications.”}}]}
Frequently Asked Questions
How to disable VBS in Windows 11?
To disable VBS, go to Control Panel > Programs > Turn Windows Features on or off.
How to disable VBS in BIOS?
Press F2, then press Delete.
What is VBS Windows 11?
VBS stands for Visual Basic Script. It is a programming language that allows you to create software, games, and other applications.
Related Tags
- disable vbs windows 10
- windows 11 gaming performance
- windows 11 download
- core isolation page not available
- hypervisorlaunchtype